How To Deploy A Spring Boot Application

How To Deploy A Spring Boot Application
So far we’ve been running integration tests, now it’s time to run the application.
Normally when you build a web application it has to be packaged into a war file and then deployed in a server to run the application.
Here I have built a web application with spring boot. and the convenience of it is that it doesn’t have to be packaged to a war file or deployed in an external server to run the application. But that doesn’t mean that you cannot do a typical deployment with it.
There are quite a few options or ways of running the application, each has its uses and benefits. we’ll explore all of them one by one.
First, let’s look at the easiest and the quickest option.
Run the Spring Boot Application Using Gradle Command Line
Execute the ./gradlew bootRun command in a terminal to start your Spring Boot application.
There’s a bootRun task in the Spring Boot plugin which allows us to run the application without having to package it.
So all you have to do is to run the task on command line.
./gradlew bootRun
How to run a Spring Boot Application as an executable jar
First build the application using gradle build command, which will produce an executable jar file.
Then execute the jar file in the command line as you would run any other jar file using the command java -jar name-of-the-jarfile.jar
Creating the executable jar file is done by the bootjar task of the Spring Boot Gradle plugin, but you don’t have to run this explicitly because,
the assemble task is automatically configured to depend upon the bootJar task so running assemble (or build) will also run the bootJar task.
Change directory to build/libs directory and run the below command.
java -jar comment.jar
comment.jar is the name of the jar file.
How To Create An Executable War File In Spring Boot With Gradle
For this, you should initialize the servlet context by overriding the configure() method of the main application class.
The main application class of a Spring Boot application already extends from the SpringBootServletInitializer, so all you have to do is to override the configure() method and add the line return builder.sources(NameOfTheMainApplicationClass.class) in it.
@SpringBootApplication
public class CommentApplication extends SpringBootServletInitializer {

    @Override
    protected SpringApplicationBuilder configure(SpringApplicationBuilder builder) {
        return builder.sources(CommentApplication.class);
    }

    public static void main(String[] args) {

        SpringApplication.run(CommentApplication.class, args);
    }

}
Next, add the war plugin to the build file in the plugins sections.
plugins {

    id 'java'
    id 'eclipse'
    id 'war'

    id 'org.springframework.boot' version '2.1.8.RELEASE'
    id 'io.spring.dependency-management' version '1.0.8.RELEASE'
}
Now run a gradle build to package this to an executable war.
Now you can run the war file with the below command
java -jar comments.war
How To Deploy Spring Boot Application To External Server
First, initialize the servlet context by overriding the configure() method of the main application class.
The main application class of a Spring Boot application already extends from the SpringBootServletInitializer, so all you have to do is to override the configure() method and add the line return builder.sources(NameOfTheMainApplicationClass.class) in it.
Then, exclude the embedded tomcat dependency so that it would not conflict with the external server’s own classes.
Then package the application to a war file. You could move the Spring Boot Tomcat dependencies to a separate folder in the war file, or you could remove them completely from the war file.
Then deploy this war file in your server as usual.
How To Exclude Embedded Tomcat In Spring Boot Application
The spring-boot-starter-tomcat dependency is included by the spring-boot-starter-web dependency. So to move it out of the implementation dependencies, add it as a providedRuntime dependency.
dependencies {


    implementation 'org.springframework.boot:spring-boot-starter-data-jpa'
    implementation 'org.springframework.boot:spring-boot-starter-web'
    implementation 'javax.inject:javax.inject:1'

    providedRuntime 'org.springframework.boot:spring-boot-starter-tomcat'

    runtimeOnly 'com.h2database:h2'
    runtimeOnly 'mysql:mysql-connector-java'

    testImplementation 'org.springframework.boot:spring-boot-starter-test'
}
This will move the libraries to WEB-INF/lib-provided directory inside the war file.

If I build the project now, it’ll package the application to a war file which can be deployed in an external container such as Wildfly or Tomcat.
But what if I want to reduce the size of the war file and get rid of the embedded server dependencies completely from the war file?
If I deploy this in an external server, those dependencies are of no use anyway.
So, to do that we should create a normal war file using the original war plugin of gradle.
What happened earlier is that, even though I added the war plugin to the project, the spring boot Gradle plugin overrides it by the bootWar task.
To execute the normal war task, it should be enabled.
war{
    enabled = true
}
And I also want to generate the executable war file as well, so that we can compare the two,
In order to do that, I’ll configure the bootJar task to add a classifier boot to the war file generated by it.
bootWar{
    classifier = 'boot'
}
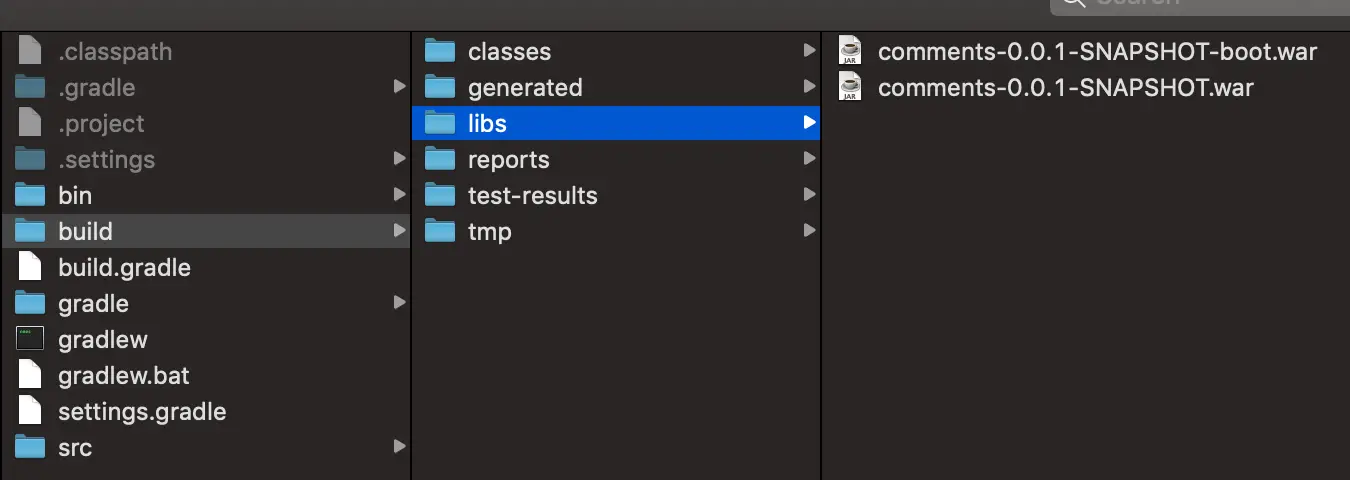
Now when I build the application, I’ll have two war files created, one is the normal war file without the embedded server and the other is the executable war file.
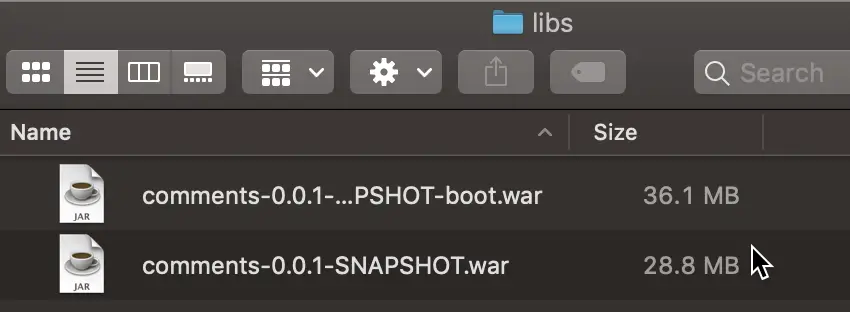
So here are the two war files.


As you can see, The normal war file is smaller in size than the executable war file.
Now, to deploy this normal war file in the WildFly server, copy that into the deployments folder, and start the server.
Please find the complete source code @ https://github.com/JavaCodeHouse/comments-application

